Developer Guide
Welcome to the TAA Developer Guide!
Teaching Assistant Assistant (TAA) is a desktop app for Teaching Assistants (TA) to track student progress and tasks, optimized for use via a Command Line Interface (CLI) while still having the benefits of a Graphical User Interface (GUI).
This developer guide serves the purpose of helping developers to quickly gain the knowledge they need to start contributing in developing TAA.
- Welcome to the TAA Developer Guide!
- Acknowledgements
- Setting up, getting started
- Design
- Implementation
- Documentation, logging, testing, configuration, dev-ops
- Appendix: Requirements
- Appendix: Instructions for manual testing
- Appendix: Effort
Acknowledgements
- Mockito for mocking objects in tests
Setting up, getting started
Refer to the guide Setting up and getting started.
Design
.puml files used to create diagrams in this document can be found in the diagrams folder. Refer to the PlantUML Tutorial at se-edu/guides to learn how to create and edit diagrams.
Architecture

The Architecture Diagram given above explains the high-level design of the App.
Given below is a quick overview of main components and how they interact with each other.
Main components of the architecture
Main has two classes called Main and MainApp. It is responsible for,
- At app launch: Initializes the components in the correct sequence, and connects them up with each other.
- At shut down: Shuts down the components and invokes cleanup methods where necessary.
Commons represents a collection of classes used by multiple other components.
The rest of the App consists of four components.
-
UI: The UI of the App. -
Logic: The command executor. -
Model: Holds the data of the App in memory. -
Storage: Reads data from, and writes data to, the hard disk.
How the architecture components interact with each other
The Sequence Diagram below shows how the components interact with each other for the scenario where the user issues the command student delete 1.

Each of the four main components (also shown in the diagram above),
- defines its API in an
interfacewith the same name as the Component. - implements its functionality using a concrete
{Component Name}Managerclass (which follows the corresponding APIinterfacementioned in the previous point.
For example, the Logic component defines its API in the Logic.java interface and implements its functionality using the LogicManager.java class which follows the Logic interface. Other components interact with a given component through its interface rather than the concrete class (reason: to prevent outside component’s being coupled to the implementation of a component), as illustrated in the (partial) class diagram below.

The sections below give more details of each component.
UI component
The API of this component is specified in Ui.java

The UI consists of a MainWindow that is made up of parts such as CommandOutput, CommandInput, StudentListPanel, and TaskListPanel. All these, including the MainWindow, inherit from the abstract UiPart class which captures the commonalities between classes that represent parts of the visible GUI.
The UI component uses the JavaFx UI framework. The layout of these UI parts are defined in matching .fxml files that are in the src/main/resources/view folder.
The UI component,
- executes user commands using the
Logiccomponent. - listens for changes to
Modeldata so that the UI can be updated with the modified data. - keeps a reference to the
Logiccomponent, because theUIrelies on theLogicto execute commands. - depends on some classes in the
Modelcomponent, as it displaysStudentobjects andTaskobjects residing in theModel.
Logic component
API : Logic.java
Here’s a (partial) class diagram of the Logic component:

How the Logic component works:
- When
Logicis called upon to execute a command, it uses theTaaParserclass to parse the user command. - This results in a
Commandobject which is executed by theLogicManager.- If the command takes in no arguments, the
Commandis directly created. - If the command takes in arguments, a parser is created to create the
Command.
- If the command takes in no arguments, the
- The command can communicate with the
Modelwhen it is executed (e.g. to add a student). - The result of the command execution is encapsulated as a
CommandResultobject which is returned back fromLogic.
The Sequence Diagram below illustrates the interactions within the Logic component for the execute("student delete 1") API call.

DeleteCommandParser should end at the destroy marker (X) but due to a limitation of PlantUML, the lifeline reaches the end of diagram.
Here are the other classes in Logic (omitted from the class diagram above) that are used for parsing a user command:

How the parsing works:
- Let
ABCrepresent the name of a command that takes in at least one argument. Examples ofABCincludeTaskDeleteandTutorialGroupAdd. - When called upon to parse a user command, the
TaaParserclass creates anABCCommandParserthat uses the other classes shown above to parse the user command to create anABCCommandobject (e.g.,TaskDeleteCommand) which theTaaParserreturns back as aCommandobject. - All
ABCCommandParserclasses inherit from theParserinterface so that they can be treated similarly where possible e.g, during testing.
Model component
API : Model.java

The Model component,
- stores the address book data i.e., all
Studentobjects (which are contained in aUniqueStudentListobject). - stores the currently ‘selected’
Studentobjects (e.g., results of a search query) as a separate filtered list which is exposed to outsiders as an unmodifiableObservableList<Student>that can be ‘observed’ e.g. the UI can be bound to this list so that the UI automatically updates when the data in the list change.- The same configuration applies to
TaskandTutorialGroupobjects.
- The same configuration applies to
- stores the
GradeMapwhich maps a uniqueGradeKey(composed of aStudentandTaskobject) to aGradeobject - stores a
UserPrefobject that represents the user’s preferences. This is exposed to the outside as aReadOnlyUserPrefobjects. - does not depend on any of the other three components (as the
Modelrepresents data entities of the domain, they should make sense on their own without depending on other components)
Storage component
API : Storage.java

The Storage component,
- can save both address book data and user preference data in json format, and read them back into corresponding objects.
- inherits from both
AddressBookStorageandUserPrefStorage, which means it can be treated as either one (if only the functionality of only one is needed). - depends on some classes in the
Modelcomponent (because theStoragecomponent’s job is to save/retrieve objects that belong to theModel)
Common classes
Classes used by multiple components are in the seedu.addressbook.commons package.
Implementation
This section describes some noteworthy details on how certain features are implemented.
Summary of Implementations
| Feature | Description |
|---|---|
| Tutorial Group | Allows the user to add tutorial groups to students |
| Task | Allows the user to add tasks to students |
| Grade | Allows the user to add grades to students |
| Task Sorting | Allows the user to sort tasks by deadline |
| Mass Actions | Allows the user to perform actions on multiple students at once |
| Expanding Task List | Allows the user to expand the task list to see more details |
Tutorial group feature
Implementation
The tutorial group feature is facilitated by TutorialGroup. It implements the following operations:
-
TutorialGroup#TutorialGroup(String)— Create a tutorial group with the name provided. The name must follow a format of “TXX”. -
TutorialGroup#isSameTutorialGroup()— Check whether the two tutorial groups have the same name. -
TutorialGroup#getStudents()— Gets a list of students belong to this tutorial group.
Given below is an example usage scenario and how the undo/redo mechanism behaves at each step.
Step 1. The user launches the application for the first time.
Step 2. The user executes tutorialList command to display all the tutorial groups.
Step 3. The user executes tutorialAdd g/T03 command to add a new tutorial group.
Step 4. The user executes studentEdit 1 g/T03 command to assign the first student to the newly created tutorial group.
Design Considerations
The implementation for tutorial group is quite similar to what was done for the base AB3.
Show below is an activity diagram of how a tutorial group is added.
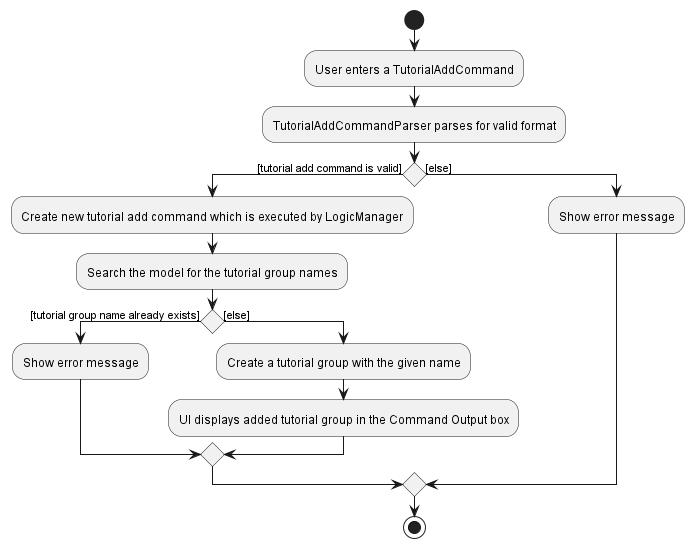
However, the main difference comes with the ability to enroll a student in a tutorial group. In TutorialGroup, we had to
use a list of students to represent the students enrolled in this tutorial group.
However, we couldn’t create new Student and TutorialGroup when we enroll a student.
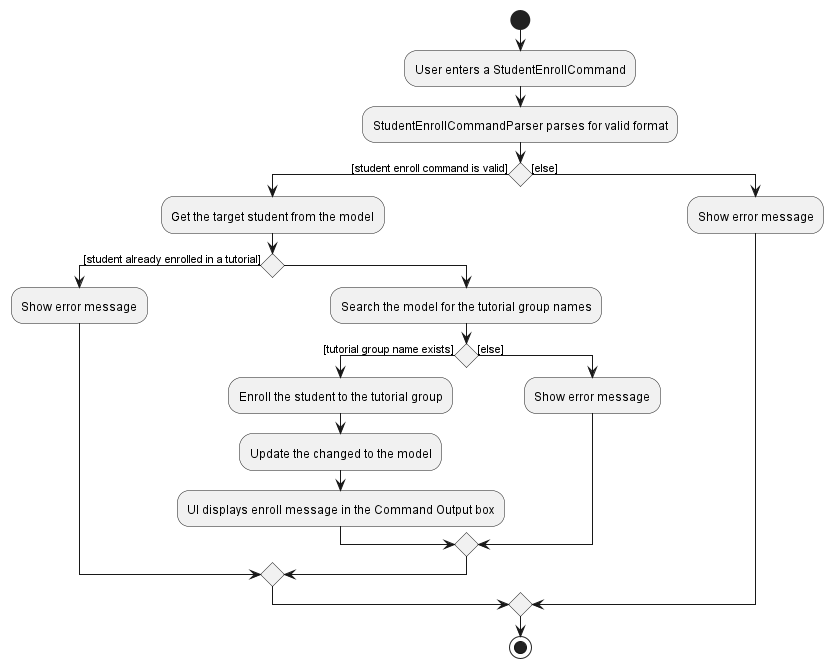
Therefore, we decided to use a isSameTutorialGroup method to look for the target tutorial group, and update the tutorial
group field of the target student.
Show below is an activity diagram of how a student is enrolled in a tutorial group.
Task feature
Description
The task features is an extension on AB3 to add a list of tasks to the Model that we then use to track different
tasks that the user has to complete.
Implementation
The task feature is facilitated by Task. It implements the following operations:
- Adding Tasks using a Name, Description, Deadline and assigned students (Optional)
- Deleting Tasks using the Task’s index
- Editing Tasks using the Task’s index
- Marking Tasks as done using the Task’s index (In Progress)
- Viewing Tasks
Below is the class diagram for Task.

Design Considerations
The implementation is quite similar to what was done for the base AB3, as well as the tutorial group and student feature. However, there were a few differences in the implementation that we had to take note of.
The main issue comes with the ability to edit tasks. In TutorialGroup and Student,
the implementation of the edit command was quite simple, which was to have a class to store all the changes
and merge them with the states in the Model. However, in Task, the implementation was a bit more complex,
as we had to take into account the students assigned to the task. We couldn’t create new Students and then edit
the task, since the students would be new and not in the Model yet. Thus, we had to use a different method,
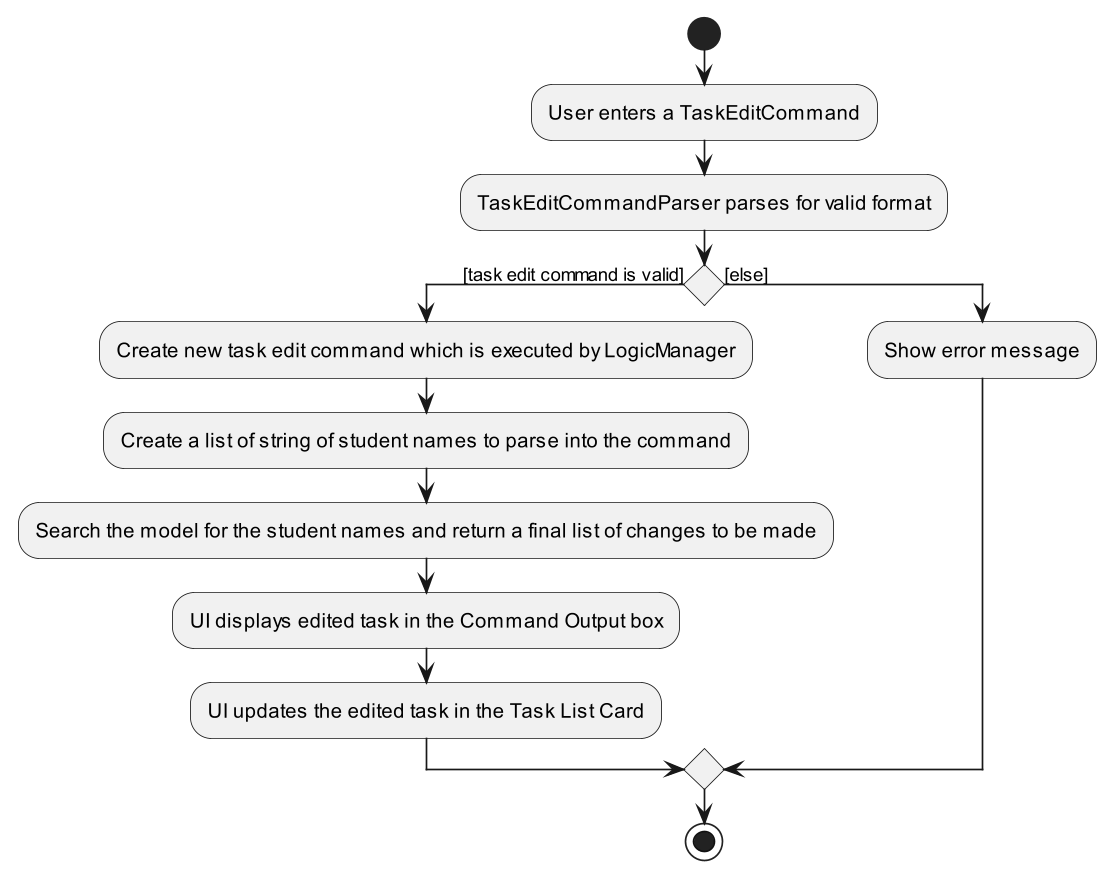
instead opting to defer the creation of the new Task to the Model itself. This was done by rewriting the
code to parse in all the fields of Task and leaving student as a list of Strings, which we then use to search through
the Model to find the students that are assigned to the task.
Show below is an activity diagram of how a task is edited.
Grade feature
Description
In TAA, the user can specify whether they have graded a Student’s Task or not.
Implementation
Model
The model component contains a GradeMap, which maps a GradeKey object to a Grade enum.
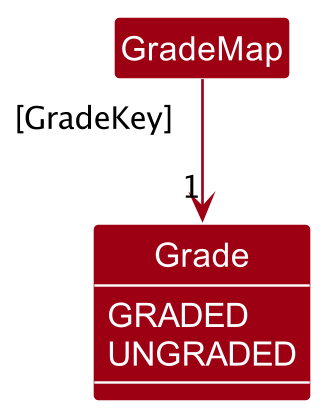
GradeKey and Key is a qualified association: any given GradeKey object will be associated with at least and at most one Grade, but due to a limitation of PlantUML, the correct UML notation for a qualified association has not been displayed.
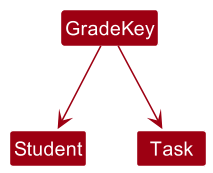
Since a Grade object is associated with a Student and Task pair, GradeKey consists of a Student field and a Task field.
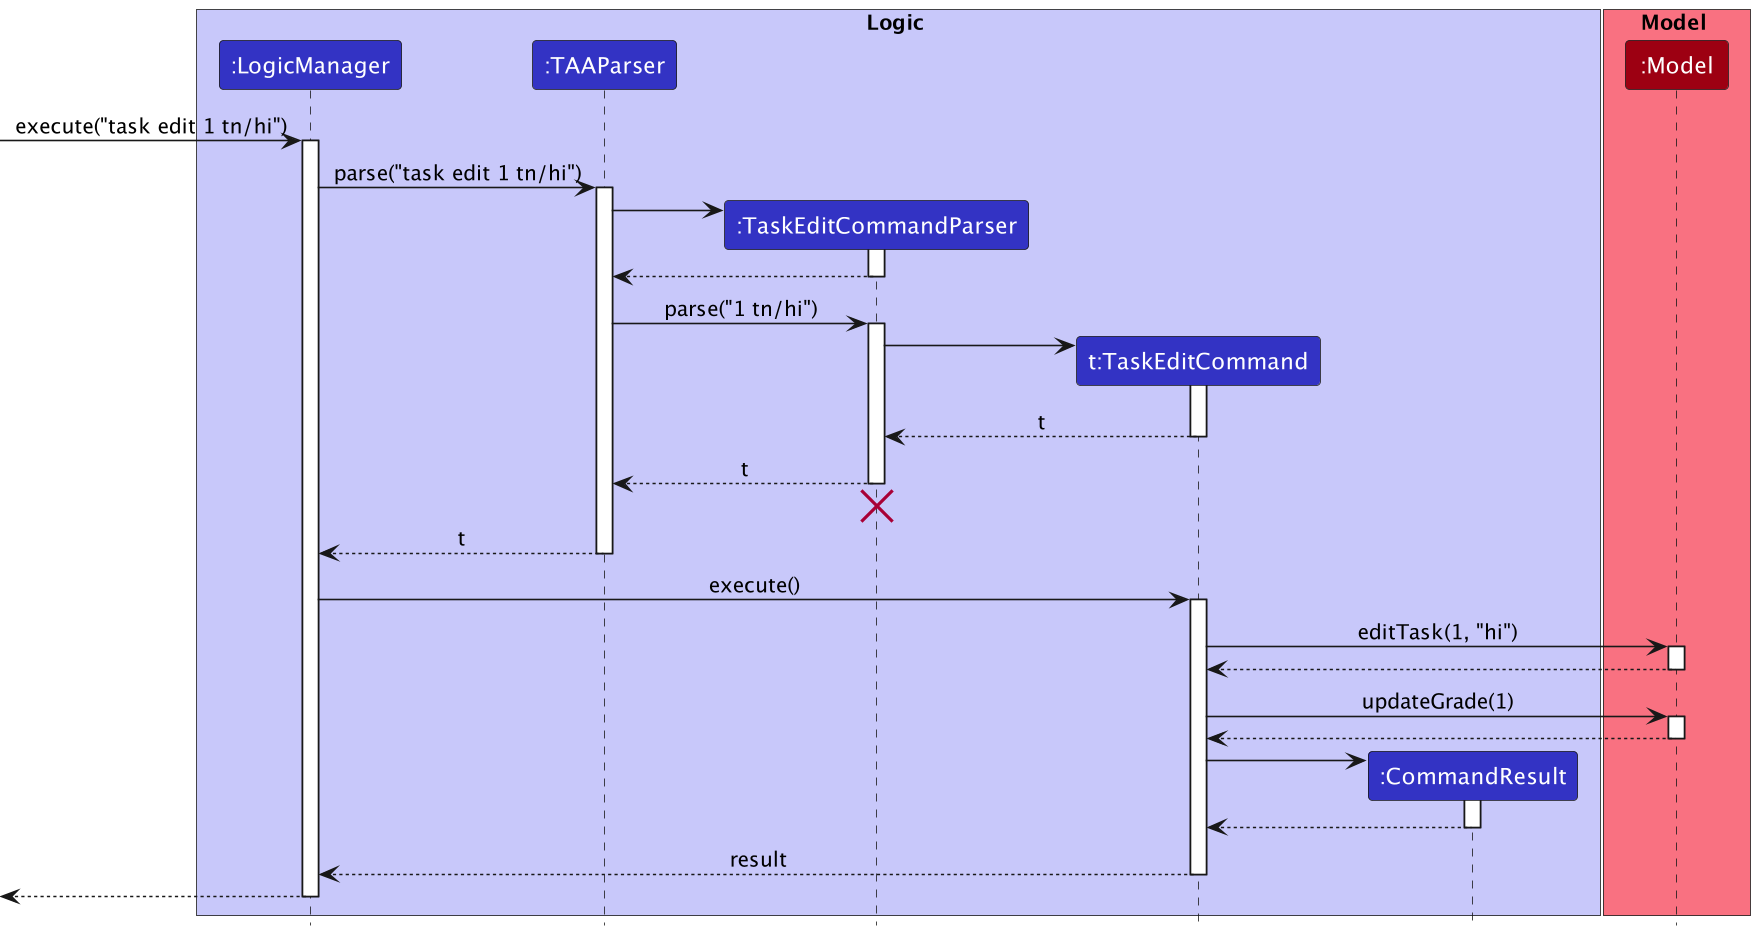
Therefore, editing the Task or Student using task edit or student edit necessitates updating the GradeMap as well, since the edit commands generate new Task and Student objects.
Given below is a sequence diagram illustrating this when the user uses the task edit 1 tn/hi command.
Commands
Viewing the grade with grade view
The sequence diagram below illustrates the interactions within the Logic component for the execute("grade view 1 2") API call, where 1 is the student index and 2 is the task index.
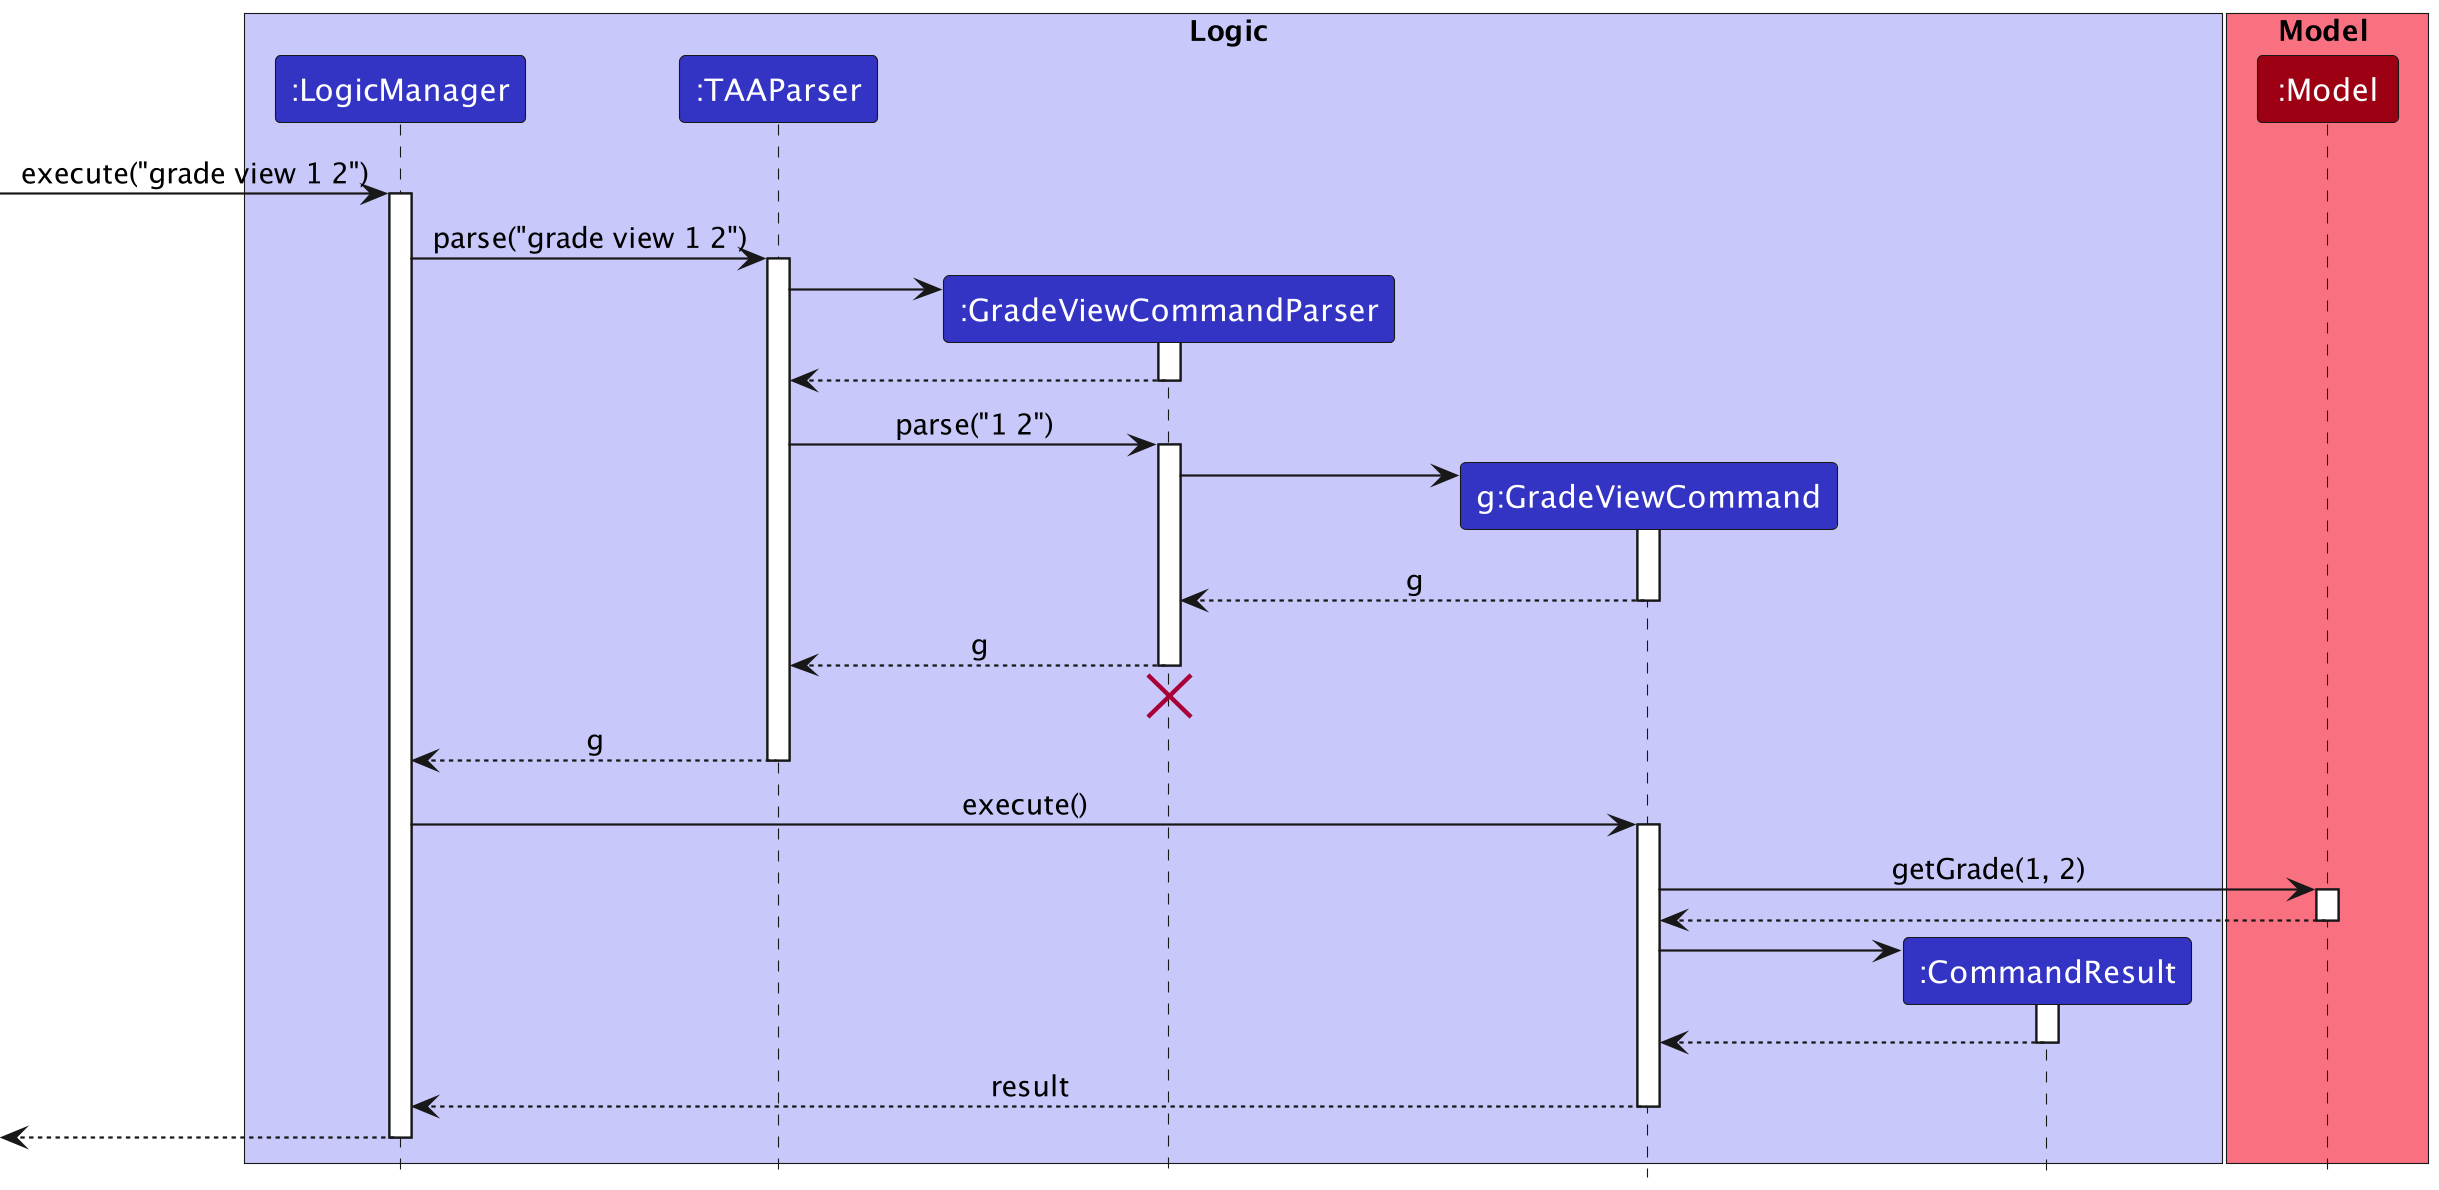
GradeViewCommand should end at the destroy marker (X) but due to a limitation of PlantUML, the lifeline reaches
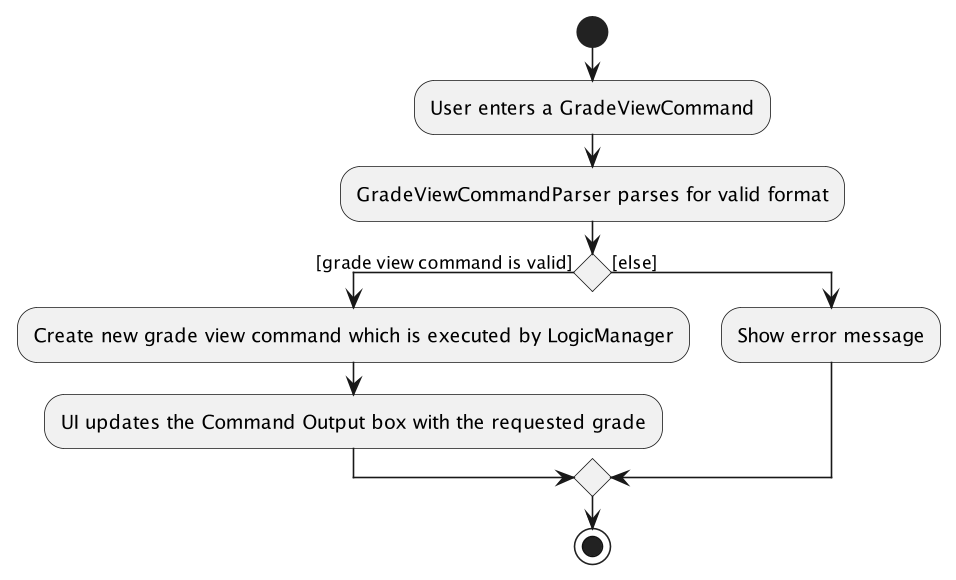
the end of diagram.The following activity diagram summarizes what happens when the user executes this command:
Editing the grade with grade edit
The sequence diagram below illustrates the interactions within the Logic component for the execute("grade view 1 2 gr/T") API call, where 1 is the student index and 2 is the task index.
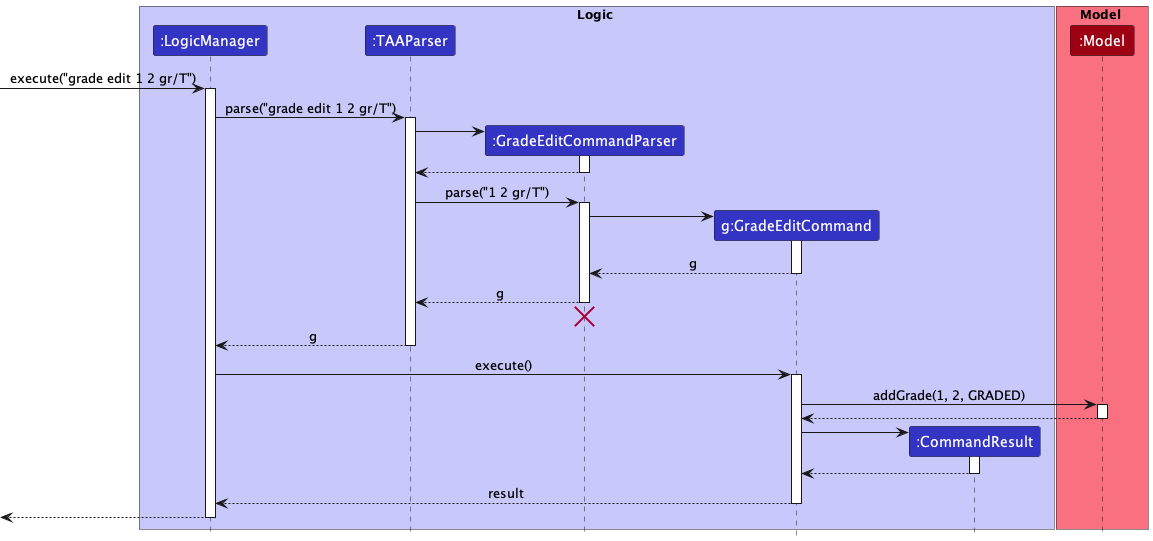
GradeEditCommand should end at the destroy marker (X) but due to a limitation of PlantUML, the lifeline reaches
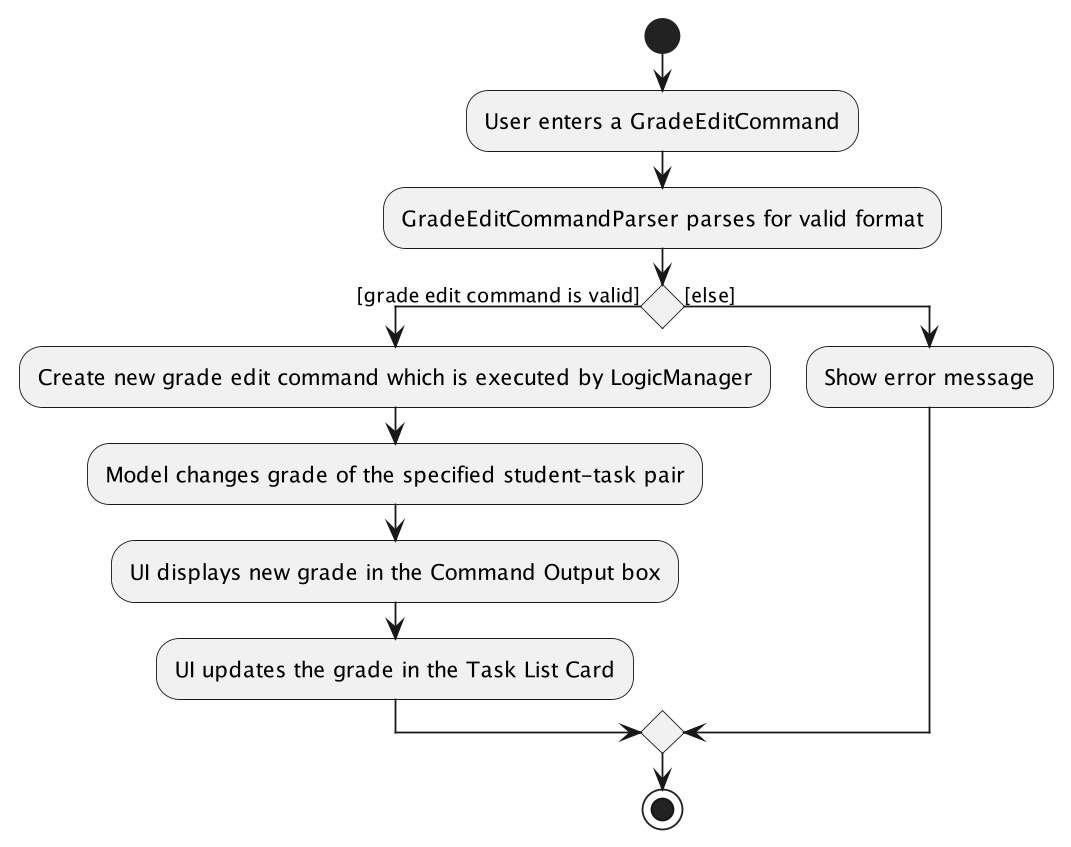
the end of diagram.The following activity diagram summarizes what happens when the user executes this command:
Design Considerations
Aspect: Representation of a grade
-
Alternative 1 (current choice):
Gradeis an enum.- Pros:
- Easier and faster to implement than making
Gradea full-fledged class. -
Grades are a group of constants, so makingGradean enum is natural. - While for now only two grades are supported (“graded” and “ungraded”), in the future, more grades can easily be added in the enum.
- Easier and faster to implement than making
- Cons:
- In the future, if operations are to be done on
Grade, then it is better to switch to implement as a class rather than an enum.
- In the future, if operations are to be done on
- Pros:
-
Alternative 2:
Gradeis a boolean.- Pros:
- Easier and faster to implement than making
Gradean enum. - Uses less memory since a boolean is a primitive type which can be either
trueorfalse.
- Easier and faster to implement than making
- Cons:
- More grades cannot be added easily in the future. A switch to an enum or a class must be made in that case.
- Pros:
-
Alternative 3:
Gradeis a class- Pros:
- Extremely customisable. Any
Stringcan be encapsulated inside aGradeclass. - Instance methods can prove to be useful and make codebase more cohesive by grouping
Graderelated methods into theGradeclass.
- Extremely customisable. Any
- Cons:
- Harder to test
- Most memory-intensive
- Slowest to implement
- Pros:
In the interest of future extensibility and fast implementation, Grade was made an enum.
Aspect: Choice of collection for GradeMap
-
Alternative 1 (current choice): Use a
HashMap.- Pros: O(1) lookups in
HashMap - Cons:
- Provides only methods for lookup and removal of entries.
- A
HashMapdoes not maintain order of the entries.
- Pros: O(1) lookups in
-
Alternative 2: Use a
TreeMap.- Pros:
TreeMapprovides methods likelowerKey()andhigherKey()that can be used to answer queries that are more complicated than lookups. - Cons: Slower,
O(log n)lookups
- Pros:
-
Alternative 3: Use an
ArrayList.- Pros:
- Can support a wider variety of queries than a
TreeMap - Has a corresponding
FilteredListthat can be used to highlight results of a query in a way that is faster to implement.
- Can support a wider variety of queries than a
- Cons:
- Very slow,
O(n)lookup. This can be especially problematic when there are a large number ofStudents andTasks. - Cumbersome implementation.
- Very slow,
- Pros:
The HashMap Java Collection was chosen because of faster lookups, since in the current iteration of TAA, the GradeMap is only used to add and retrieve grades. However, in the future, GradeMap can be changed easily to use a TreeMap instead. A TreeMap implementation would prove useful if more than 2 grades are added and a filter feature is desired, for example, get a list of Students who scored more than a B in a particular Task. ArrayList was rejected because it is cumbersome to implement and is not as performant.
Sort task by deadline feature
Implementation
The sort task by deadline mechanism will be implemented without the need to enter additional commands.
Additionally, its feature is exposed in the List interface by calling its sort method.
The sort method wil automatically sort its tasks by ascending order whenever a new task is added or an existing task is edited.
Given below is an example usage scenario of adding a new task and how the task sorted by deadline mechanism behaves.
Step 1. The user launches the application and enters the respective task add command.
Step 2. If the command is successful, a task object is created and will eventually be passed to UniqueTaskList.
Step 3. UniqueTaskList will add the Task object to an object of type ObservableList<Task>
Step 4. UniqueTaskList will then call its own method sortByDeadline
Step 5. sortByDeadline will call the sort method of the same object of type ObservableList<Task> from Step 5.
Step 6. The sort method takes in an object of type Comparator which compares two different Task objects’ based on its deadline variable.
Step 7. The sort method then iterate the object of type ObservableList<Task> and arrange them according to their deadline in ascending order.
The Sequence Diagram below shows how the components interact with each other for the scenario during task sort when a user adds a new task. Similar interactions take place when a user edits a task or removes a task.
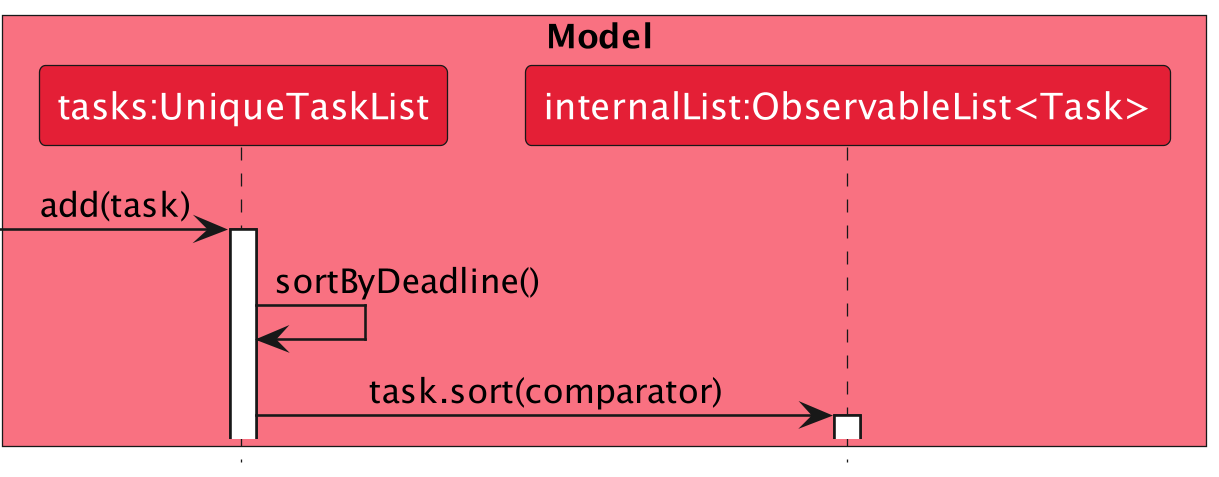
Design considerations:
Aspect: How sorting task by deadline executes:
-
Alternative 1 (current choice): sort tasks by default.
- Pros: Easy to implement.
- Cons: Might not be ideal if users do not want it to be sorted.
-
Alternative 2: Individual command to sort tasks.
- Pros: User has a choice whether they want their list to be sorted.
- Cons: More classes to implement e.g.
taskSortCommand.javaandtaskSortCommandParser.java.
Mass Actions feature
Description
The idea behind Mass Actions is to be able to chain together multiple commands without having to type them out one by one. This is useful for when the user wants to perform the same action on multiple students or tutorial groups.
Implementation
The mass actions feature requires a rework of the parsers, particularly StudentDeleteCommandParser and TaskDeleteCommandParser. Instead of parsing a single index, the parsers will parse a range of indices, then loop through each index, getting the task before deleting it.
Design Considerations
The implementation is different from the original AB3 implementation, as there were some special considerations to keep in mind. The key issue was that we had to do two separate loops, one for getting the list of tasks/students to delete, before then proceeding to delete them. This is because if we attempt to do it in a single loop, we encounter an error where the list of tasks/students is modified while we are iterating through it.
Alternative Considerations
Another way of doing this instead of completely reworking the commands would be to overload the constructor, however, it seemingly would not be as clean as the current implementation, as the current implementation is able to handle one or more indices, while the alternative implementation would be doing double work to cover the case with one index.
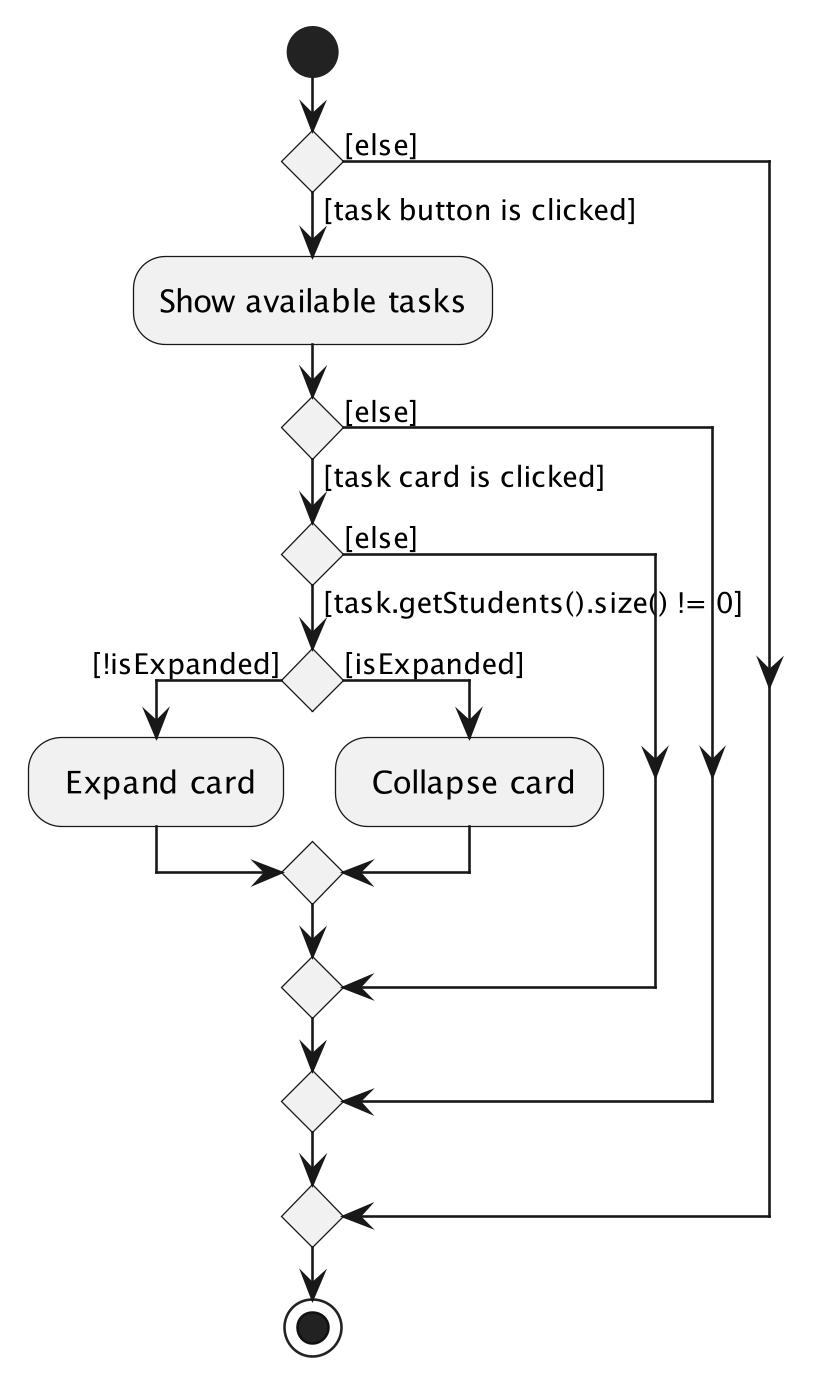
Expanding TaskListCard feature
Description
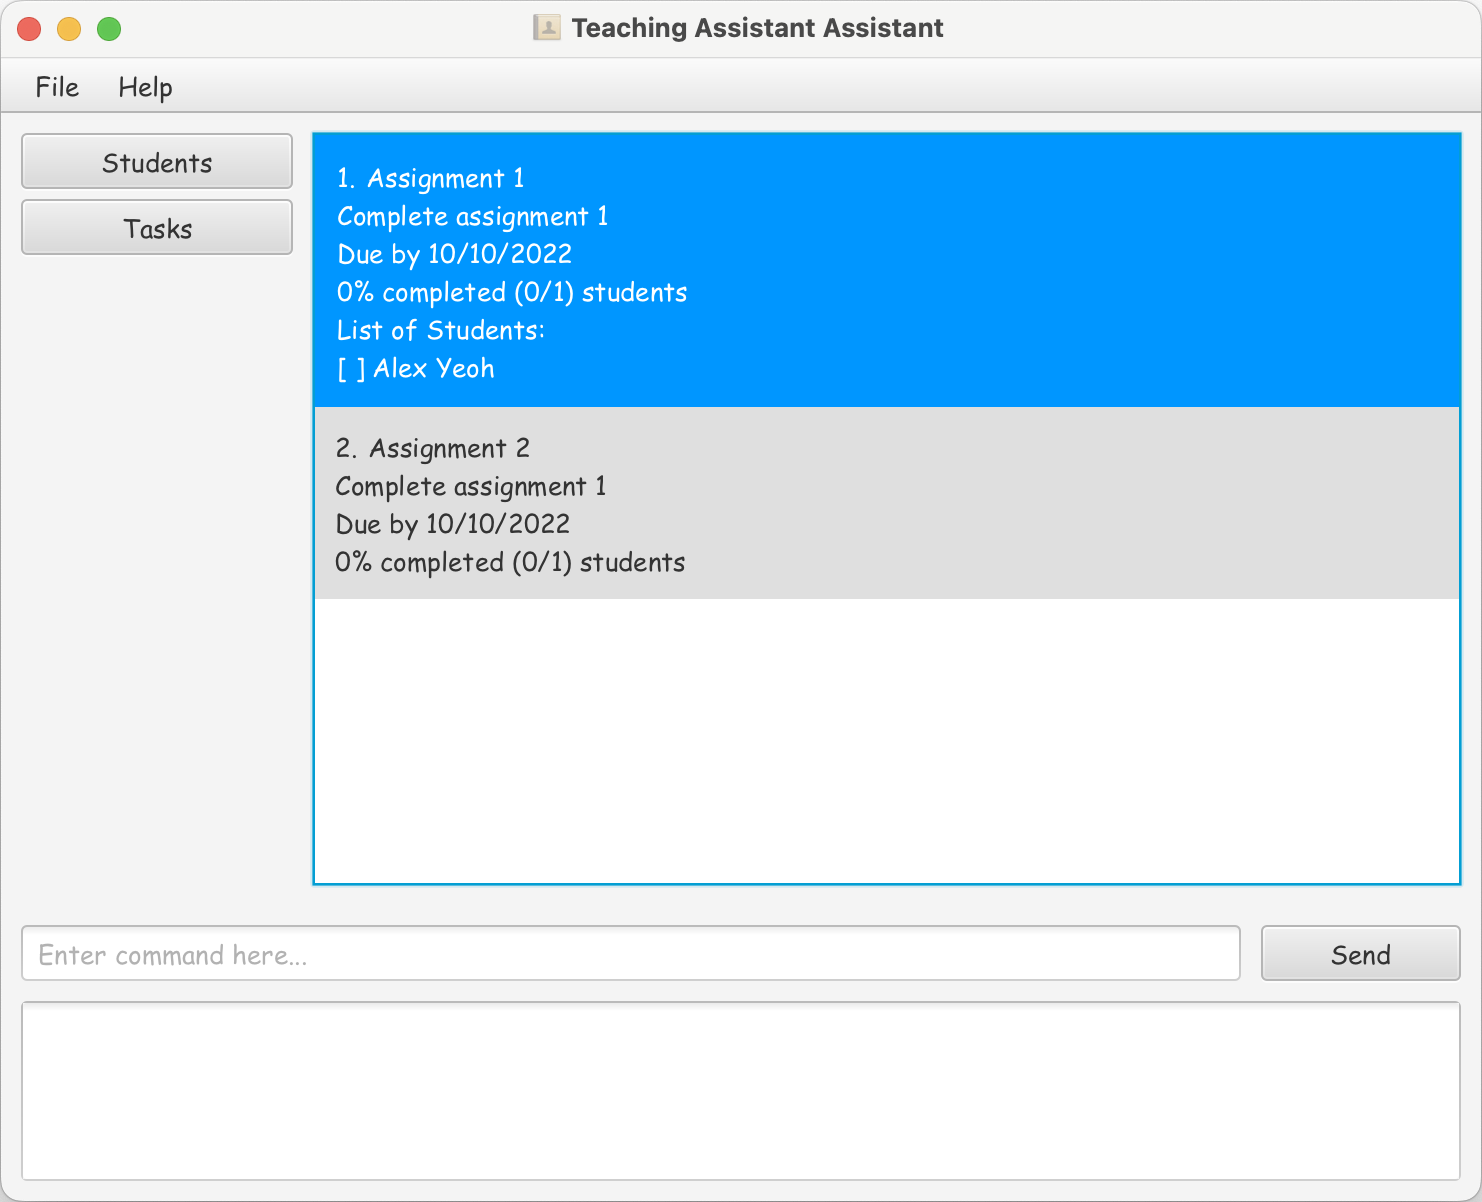
In TAA, the user can specify which Students a Task has to be completed for. In the UI, each Task is displayed as a TaskListCard. The TaskListCard can be clicked to show or hide the Students.
The part of the UI highlighted in blue and grey are the TaskListCards. The blue card has been clicked to show the Students, while the grey card has a collapsed Student list.
Implementation
Every TaskListCard contains:
- a
VBox optionalInfoUI component which displays the students’ names to the user, - a
boolean isExpandedattribute to determine whether to show theoptionalInfo, and - a
void onCardClicked()method to toggleisExpanded.
Design Considerations
If a Task has no Students,
- clicking on its
TaskListCarddoes nothing, and -
"No students are assigned to this task."is displayed to the user.
Alternative Designs Considered
- Always show the students for all tasks. This is rejected because tutorial groups contain many students. This allows very few tasks to be displayed on the UI at one time. This prevents the user from having an at-a-glance view of their tasks.
-
Display the students for a task in a pop-up dialog box. This is rejected because we wish to minimise the number of mouse clicks needed to switch from viewing the students under Task 1 to viewing the students under Task 2.
- In the current design, the user only needs to click once on Task 2 to collapse Task 1 and expand Task 2.
- This alternative design requires the user to click on the Close button on Task 1’s dialog box, and then click again on Task 2.
Here’s an activity diagram to demonstrate the Expanding TaskListCard feature.
Documentation, logging, testing, configuration, dev-ops
Appendix: Requirements
Product scope
Target user profile:
- is a SoC student TA who wants to manage a lot of tasks and students in their care
- has a need to manage different students of varying learning speeds
- needs a way to mass manage all their students and respective tasks
- prefer desktop apps over other types
- can type fast
- prefers typing to mouse interactions
- is reasonably comfortable using CLI apps
Value proposition:
- manage contacts faster than a typical mouse/GUI driven app
- a way for student TAs to efficiently keep track of students’ progress and tasks
User stories
Priorities: High (must have) - * * *, Medium (nice to have) - * *, Low (unlikely to have) - *
| Priority | As a … | I want to … | So that I can… |
|---|---|---|---|
* * * |
new user | see usage instructions | refer to instructions when I forget how to use the App |
* * * |
Teaching Assistant | be able to manage (CRUD) a list of my students | find and manage my students |
* * * |
Teaching Assistant | be able to manage (CRUD) any student’s task list | find and manage my tasks |
* * * |
Teaching Assistant | keep track of which students’ assignments I have graded and not graded | can find the ungraded assignments faster |
* * * |
Teaching Assistant with multiple tutorial groups | keep track of which student is in which group | manage students based on their tutorial groups |
* * * |
Teaching Assistant | be able to assign deadlines to my tasks | keep track of the upcoming tasks easily |
* * * |
Teaching Assistant | a way to do mass actions | can save time |
* * |
Teaching Assistant | leave comments on students’ submissions | can help them learn from their mistakes |
* * |
busy Teaching Assistant | want to prioritise tasks based on their deadline | can avoid missing deadlines |
Use cases
(For all use cases below, the System is the TAA and the User is the teaching assistant, unless specified otherwise)
Use case UC1: Add a student
MSS
- User chooses to add a student record.
- TAA displays the page for adding student.
- User inputs the details of the student.
- User confirms the details.
-
TAA add the record to the system.
Use case ends.
Extensions
-
3a. TAA checks for duplicates and incorrect formating.
-
3a1. TAA requests for correct data and format.
-
3a2. User inputs the correct data.
-
Steps 3a1-3a2 are repeated until the data entered are correct.
Use case resumes from step 4.
Use case UC2: Edit a student record
MSS
- User searches for his/her name or ID.
- TAA displays all the students records with a matching signature.
- User chooses the correct student.
- User edit the student record.
- User confirms the update.
-
TAA saves the new student record.
Use case ends.
Extensions
-
2a. TAA cannot find any student record with a matching signature.
-
2b. TAA requests for re-enter.
-
2c. User re-enter the student name or ID
Use case resume from step 3.
Use case UC3: Tag a student who has not finished his/her assignments
MSS
- User searches for his/her name or ID.
- TAA displays all the students records with a matching signature.
- User chooses the correct student.
- User chooses the type of tag.
- User confirms the tagging action.
-
TAA register the tag and update accordingly.
Use case ends.
Use case UC4: Enroll a student to a tutorial group
MSS
- User searches for his/her name or ID.
- TAA displays all the students records with a matching signature.
- User chooses the correct student.
- User searches for the name of the tutorial group.
- TAA displays all the tutorial groups.
- User chooses the correct tutorial group.
- User confirms the enrollment.
-
TAA enrolls the student to the tutorial group.
Use case ends.
Extensions
-
2a. The inputted student index is out of range.
-
2b. TAA displays error and requests re-enter of the student index.
Use case resume from step 4.
-
7a. The student is already enrolled in a tutorial group.
-
7b. TAA displays error and requests the student to be expelled from his/her current tutorial group.
-
7c. User expels the student from his/her current tutorial group.
Use case resume from step 1.
Use case UC5: Expel a student from a tutorial group
MSS
- User searches for the student’s name or ID.
- TAA displays all the students records with a matching signature.
- User chooses the correct student.
- User confirms to expel the student from his/her current tutorial group.
-
TAA expels the student from the tutorial group.
Use case ends.
Extensions
-
3a. The student is not enrolled in any tutorial groups.
-
3b. TAA displays error and requests re-enter of the student index.
Use case resume from step 3.
Use case UC6: Add a new tutorial group
MSS
- User chooses to add a new tutorial group.
-
TAA adds a tutorial group with the given name.
Use case ends.
Extensions
-
1a. There already exists a tutorial group with the same name.
-
1b. TAA requests re-enter of the tutorial group name.
Use case resume from step 2.
Non-Functional Requirements
- Should work on any mainstream OS as long as it has Java
11or above installed. - Should be able to hold up to 1000 students without a noticeable sluggishness in performance for typical usage.
- A user with above average typing speed for regular English text (i.e. not code, not system admin commands) should be able to accomplish most of the tasks faster using commands than using the mouse.
- The system should respond within two seconds
- The system should be usable by someone who’s tech illiterate
- The system should work on both 32-bit and 64-bit environments
- The system will need at least 100MB of disk space to run the application
- Teaching Assistant Assistant should give constructive feedback for invalid command
- Teaching Assistant Assistant should be able to work in an offline setting
Glossary
- Mainstream OS: Windows, Linux, Unix, MacOS
- TA: Teaching Assistant, a student who helps the lecturer in a class
- CRUD: Create, Read, Update, Delete. The four main functions that are implemented by a persistent storage application.
- SoC: School of Computing, National University of Singapore
- CLI: Command Line Interface
- GUI: Graphical User Interface
- 32-bit/64-bit: The number of bits that a computer’s CPU (Central Processing Unit) can process at one time. 32-bit CPUs can only process 32 bits of data at one time, while 64-bit CPUs can process 64 bits of data at one time. 64-bit CPUs are more powerful than 32-bit CPUs, but 32-bit CPUs are still more common in computers.
- Disk Space: The amount of space available on a computer’s hard disk for storing data.
Appendix: Instructions for manual testing
Given below are instructions to test the app manually.
Launch and shutdown
-
Initial launch
-
Download the jar file and copy into an empty folder
-
Double-click the jar file Expected: Shows the GUI with a set of sample contacts. The window size may not be optimum.
-
-
Saving window preferences
-
Resize the window to an optimum size. Move the window to a different location. Close the window.
-
Re-launch the app by double-clicking the jar file.
Expected: The most recent window size and location is retained.
-
Using the application
Student management
-
Creating, removing, and viewing students
- Create a student with the name “John Doe” using
student add n/John Doe e/abc@example.com p/91234567.
Expected: The UI is updated with the new student list. - Edit the student with the command
student edit 4 p/97654321 - Delete the student with the command
student delete 4
- Create a student with the name “John Doe” using
Task management
-
Creating, removing, grading and viewing tasks
- Create a student with the name “Assignment 1” using
task add tn/Assignement 1 i/Complete Assignment 1 d/10/10/2022.
- Click on the
TasksButton on the left side of the screen.
Expected: The UI is updated with the new task list. - Edit the student with the command
task edit 1 s/David Li - Double click on the task to view the task details. Expected: The details shows the list of students assigned to the task.
- Grade the student with the command
grade edit 1 1 gr/T - Change the view back the students, then switch back to Tasks view, the task should be updated with the new grade.
 This is a known bug with JavaFX
- Delete the student with the command
task delete 1
- Create a student with the name “Assignment 1” using
Tutorial group management
- Creating and managing tutorial groups
- Create a new tutorial group with the format TXX.
tutorial add g/T01 - See a list of tutorial groups using
tutorial list
Expected: A list of tutorial groups is shown. - Add a student to the tutorial group with the format
student enroll 1 g/T01 - The UI should be updated with the new student list with update tutorial group info.
- Filter the student list by tutorial group with the format
tutorial filter g/T01 - Clear the filter with the format
student unfilter
- Create a new tutorial group with the format TXX.
General Use Cases
Help
- Type
help mefor a link to the user guide.
Expected: A new window is opened with the user guide link.
Exiting the program
- Type
bye bye
Expected: The application exits. Data is automatically saved.
Appendix: Effort
Difficulty Level
If the implementation effort required to create AB3 from scratch is 10, the estimated implementation effort of this team is, [0..20] e.g., if you give 8, that means the team’s effort is about 80% of that spent on creating AB3. We expect most typical teams to score near to 10.
Difficulty Level: 12
Effort required
Justification for the difficulty level:
-
Moving parts - While AB3 uses only one entity type, Persons, which was adapted to be our Student, we have
multiple entities, namely
Student,Task,TutorialGroup, andGrade. This means that we have to implement multiple classes, and multiple classes that interact with each other. -
Different purposes - While some of the code for AB3 commands could be reused, there were many cases where
the code had to be redesigned and rewritten in order to fit the purpose of our application.
- For example, the Task Edit Command had to be completely rewritten because we required the ability to search through the current model’s list of students using a list of strings, and then generating a CommandOutput from that
- Other examples include the all the Grade Commands, which had to be written from scratch, as well as the Tutorial Group filtering.
- The grade command uses a Map to store the grades of students, which is a new data structure that we had to to add into the code, not previously used in AB3.
- New features - We have many new features that were not present in AB3, such as the ability to grade students, filter, as well as introducing tasks, tutorial groups and grades.
Challenges Faced
-
Learning JavaFX - We had to learn JavaFX in order to implement the GUI. This was a challenge because
there was a steep learning curve, and we had to learn how to use FXML, as well as how to use the JavaFX API.
Our efforts include:
- Creating two views – one for Tasks and another for Students, which the user can switch between by clicking on the buttons on the left side of the screen.
- Making the UI interactive, such as the ability to double click on a task to view the students assigned to the task. We had to handle the special case of a task having no students assigned to it by learning how to block users’ clicks.
- Making the UI responsive to resizing by learning how layout, padding, and margins work hand-in-hand to ensure that UI components remain well aligned, properly spaced, and sufficiently large to accommodate text.
- Implementing complex features - We had to implement many complex features, such as the ability to grade, edit tasks, and filter by tutorial group. This was a challenge because we had to design the implementation from scratch and think about the the relationships between the different classes.
- Learning Git - We had to learn how to use Git in order to collaborate on the project. This was a challenge as most of us had never used Git before, and we had to learn how to use it in order to collaborate on the project.